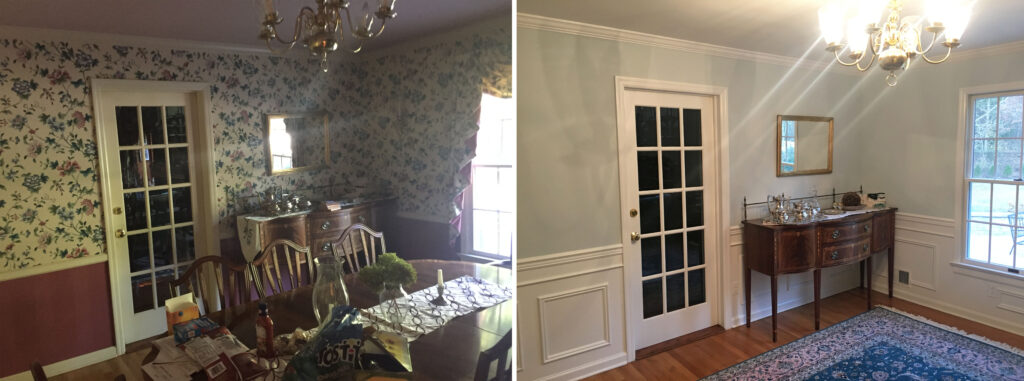
Wallpaper can significantly influence a room’s aesthetic, but tastes and interior design trends change. Whether you’re dealing with outdated wallpaper in a new home or refreshing your current space, removing old wallpaper is the first step in transforming your walls. The process can vary depending on the type of wallpaper and how it was applied, but the ultimate goal is the same: to remove the paper cleanly and safely without damaging the underlying surface.
Preparing the Room
Before you begin the wallpaper removal process, it’s crucial to prepare the room to avoid damage to flooring, furniture, and electrical fixtures.
- Clear the Area: Remove all furniture from the room or move it to the center and cover it with a drop cloth.
- Protect Flooring: Lay drop cloths or plastic sheeting on the floor to protect it from moisture and debris.
- Prepare Tools and Materials: Gather the tools and materials you’ll need, including a scoring tool, spray bottle or wallpaper steamer, putty knife, sponge, and mild detergent.
Understanding Wallpaper Types
The removal process can differ significantly depending on the type of wallpaper you’re dealing with. Generally, wallpapers can be categorized into three types:
- Strippable Wallpaper: This type is designed to be easily removed by pulling it off in large strips.
- Peelable Wallpaper: The top layer of this wallpaper can be peeled off, leaving a paper backing that must be removed separately.
- Traditional Wallpaper: This type is fully adhered to the wall and requires more effort to remove.
Step-by-Step Wallpaper Removal
1. Test for Strippability
Begin by testing a small section of the wallpaper to see if it’s strippable. Gently use a putty knife to lift a corner and pull. If it comes off in large strips, you may be able to remove the entire wallpaper this way.
2. Score the Wallpaper
If the wallpaper doesn’t strip easily, you’ll need to score it. Use a scoring tool to create small holes in the wallpaper, which will allow the steam or solution to penetrate and loosen the adhesive.
3. Apply Your Chosen Removal Method
Successfully removing wallpaper largely depends on the method you choose. Both the steamer method and the solution method are effective, but they cater to different preferences and wallpaper types. Below, we expand on each approach to help you better understand and execute the process.
Steamer Method
The steamer method involves using a device specifically designed for wallpaper removal. Here’s a detailed look at how to effectively use a wallpaper steamer:
- Setup: Begin by filling the wallpaper steamer’s tank with water, following the manufacturer’s instructions closely. Most steamers will need a few minutes to heat up and produce steam. Ensure you have a long enough extension cord to reach all areas of the room.
- Safety First: Steam can cause burns, so wear protective gloves and long sleeves. Keep the room ventilated to avoid excessive moisture buildup.
- Application: Hold the steam plate against the wall for about 10-15 seconds or as recommended by the steamer’s manual. The steam penetrates the wallpaper, softening the adhesive beneath. Move the plate in a systematic pattern to cover all areas, but avoid holding it in one place for too long to prevent damage to the wall.
- Scraping: After steaming a section, use a putty knife or a wallpaper scraper to gently peel away the wallpaper. Start from the edges or seams where the wallpaper is most likely to lift. If the wallpaper doesn’t come off easily, reapply steam to the area and try again.
- Repeat: Continue this process, working in small sections. It’s important to manage your pace—steam an area only when you’re ready to scrape it to ensure the adhesive doesn’t cool down and reattach to the wall.
Solution Method
For those who prefer a chemical-free approach or lack a wallpaper steamer, the solution method is an effective alternative:
- Prepare the Solution: Mix hot water with a few drops of mild detergent or a commercial wallpaper removal solution in a large spray bottle or a garden sprayer for larger areas. The warmth of the water helps to dissolve the adhesive more effectively.
- Scoring (Optional): For wallpapers with a water-resistant coating, lightly score the surface with a wallpaper scoring tool before applying the solution. This helps the liquid penetrate through to the adhesive layer.
- Application: Liberally spray the solution onto the wallpaper, ensuring it’s evenly and thoroughly saturated. Let the solution sit for a few minutes to penetrate and soften the adhesive. For tough areas, you may need to apply the solution multiple times.
- Scraping: Once the adhesive is softened, use a putty knife or scraper to gently peel away the wallpaper. Start at the corners or seams and proceed with caution to avoid gouging the wall.
- Tips for Tough Spots: If you encounter areas where the wallpaper is stubborn, reapply the solution and allow it to soak for a longer period. A plastic scraper can be gentler on the walls for particularly stubborn spots.
Both methods have their own set of advantages and challenges. The steamer method is highly effective but requires careful handling to avoid burns or wall damage. The solution method is simple and uses household items, but may require more time and elbow grease, especially for wallpapers that are heavily glued or have multiple layers. Whichever method you choose, patience and persistence are key to achieving clean, wallpaper-free walls.
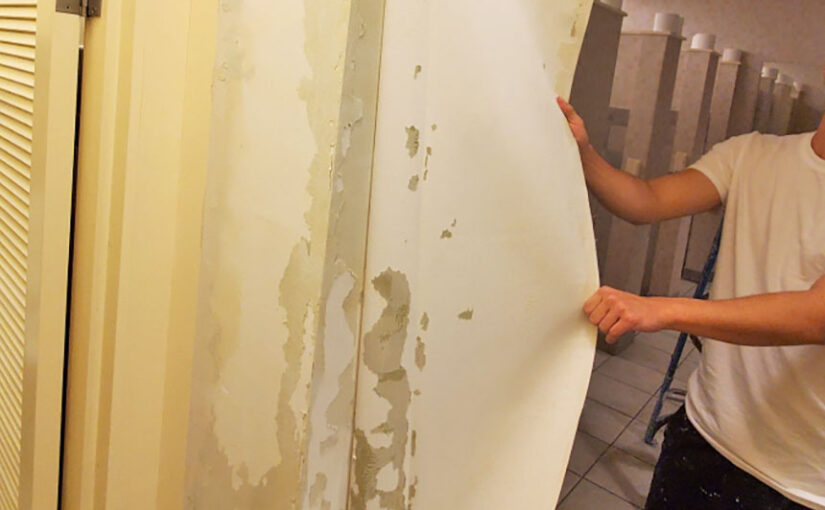
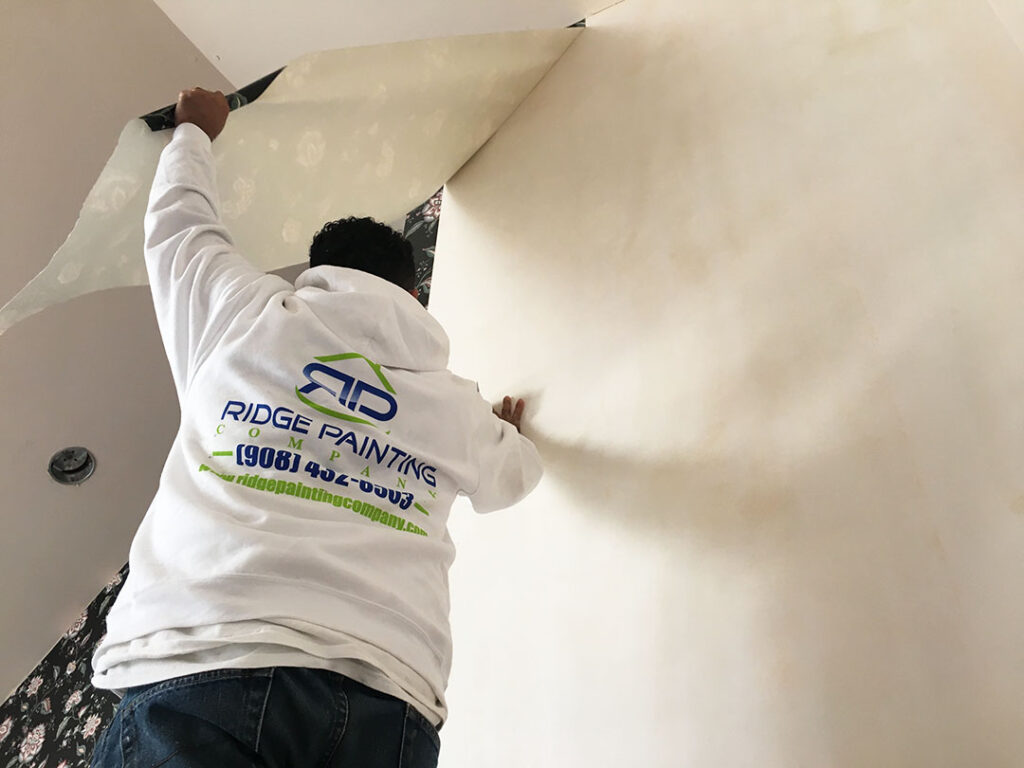
4. Scrape the Wallpaper
Using a putty knife, carefully scrape the wallpaper away from the wall. Work in sections, applying more steam or solution as needed to keep the wallpaper and adhesive soft.
5. Remove Any Residue
Once all the wallpaper is removed, there may be some adhesive residue left on the walls. Use a sponge and a solution of water and mild detergent to wash away any remaining adhesive. Rinse the walls with clean water and let them dry completely.
Dealing with Difficult Situations
- Multiple Layers of Wallpaper: If you encounter multiple layers of wallpaper, you may need to repeat the scoring and removal process for each layer.
- Damaged Drywall: If removing the wallpaper causes damage to the drywall beneath, you will need to repair these areas before repainting or applying new wallpaper. Use joint compound to fill in any gouges or holes, then sand smooth once dry.
Preparation for Next Steps: Ensuring a Perfect Finish
Once the labor-intensive task of wallpaper removal is behind you, and the walls are clean and free of residue, the next phase begins: preparing your walls for their new finish. This crucial step is where attention to detail and a little elbow grease can significantly impact the final appearance of your walls, whether you’re planning to repaint or reapply wallpaper. Here’s how to ensure your walls are in the best possible condition for whatever comes next.
Assessing Wall Condition
Start by carefully examining the walls for any damage or imperfections. Common issues include small holes, dents, or gouges left by the removal process or previously hidden by the wallpaper. Even minor flaws can become glaringly obvious once a new finish is applied, so it’s essential to address these issues head-on.
Repairing Imperfections
For small holes or dents, lightweight spackle is your best friend. Apply it with a putty knife, pressing the spackle into the hole and smoothing it over the surface. For larger repairs, you may need to use joint compound and possibly even a patching kit for substantial damage. Allow the spackle or compound to dry completely, according to the manufacturer’s instructions. Drying times can vary, so patience is key.
Sanding for Smoothness
Once your repairs are dry, sand the area until it’s flush with the wall. Use fine-grit sandpaper to avoid creating additional surface damage. Sanding not only smooths your repairs but also scuffs up the wall surface slightly, which helps the primer and new paint or wallpaper adhere better. For best results, sand the entire wall lightly. This will ensure a uniform surface that’s free of gloss or texture differences.
Cleaning Post-Sanding
After sanding, there will be a fair amount of dust on the walls and in the surrounding area. Use a damp cloth or sponge to wipe down the walls, removing all the sanding dust. A tack cloth, which is slightly sticky, can also be effective for picking up fine dust particles. Ensure the wall is completely dry before moving on to the next step.
Priming the Walls
Applying Primer is essential for achieving a professional-quality finish. It ensures that your new paint or wallpaper adheres correctly and provides a uniform base that enhances the final color or design. Choose a primer based on your wall’s condition and the type of finish you’re applying next:
- For painting: Use a high-quality latex primer. If you’re covering dark colors or stains, consider a primer specifically designed for stain-blocking.
- For wallpapering: Opt for an acrylic primer that’s designed for wallpaper application. These primers make future wallpaper removal easier and can help prevent the wallpaper adhesive from soaking too deeply into the wall.
Apply the primer with a roller or brush, following the manufacturer’s directions for application and drying times. Be sure to cover the entire surface evenly, paying extra attention to your repaired areas.

Final Thoughts
The effort you put into preparing your walls after removing wallpaper sets the stage for a flawless finish, whether you’re repainting or applying new wallpaper. By taking the time to repair, sand, clean, and prime your walls, you create a smooth, receptive surface that will hold your new finish securely and look great for years to come. Remember, the quality of your finish is directly related to the quality of your preparation.
Conclusion
While removing wallpaper can be time-consuming, following these steps will help ensure a smooth and successful removal process. By preparing properly, choosing the right tools and methods, and addressing any issues that arise, you can achieve a clean and ready-to-finish surface. Whether you plan to repaint or re-wallpaper, removing the old wallpaper is a critical step in transforming your space and making it your own.